
How I made a cinematic AI movie with Google Flow

We are making a movie with AI.
And in this newsletter, I’ll show you the exact process I used.
This was created using Google Flow and Google’s new Omni model.
The reason this matters is simple:
AI video is becoming a real content tool for business owners, creators, and marketers.
You can now create cinematic scenes around your brand without needing a full production crew.
And if you learn how to direct the model properly, you can start building content that feels much bigger than a normal social media post.
Imagine creating a Netflix-style mini-series for your brand.
A gym could create a cinematic training story.
A fashion brand could create a short film around a new drop.
A restaurant could build a visual world around the dining experience.
A founder could create launch films before hiring a production team.
That is the opportunity.
But here’s the important part.
You don’t get good AI video by just typing:
“Create a cinematic movie.”
That is too vague.
You need to direct the model.
You need a character.
You need a storyboard.
And then you need to bring both together inside the video model.
Here’s the three-step process I used.
Step 1: Create The Character
Before creating the movie, I created the main character.
This matters because the character becomes the anchor for the scene.
If you skip this step, the video can easily lose consistency.
Faces change.
Styling changes.
The mood changes.
The whole scene starts feeling random.
So I started with a very detailed character prompt.
Here is the exact prompt I used:
Prompt:
Bust portrait, centered, forward-facing, solid white background. The subject possesses a piercing, asymmetrical gaze with one eyelid subtly hooded, conveying an expression of calculating malice. A razor-thin, jagged vertical scar bisects one eyebrow. The hair is styled into an architectural, sharp-edged fringe that forms a precise “V” point above the bridge of the nose, rendered with individual strand clarity and a matte finish. Skin exhibits hyper-realistic micro-textures, including visible pores, fine beads of moisture, and subtle temple veins. The character wears a high-standing, structural collar made of dense, charcoal-textured felted wool, featuring a cold-forged, brushed steel plate integrated into the throat. Clamshell studio lighting creates intense semi-circular catchlights in the irises and highlights the high cheekbones. Captured on 105mm Hasselblad H6D-100c, emphasizing tactile surfaces and analog depth. Full head and shoulders in frame.
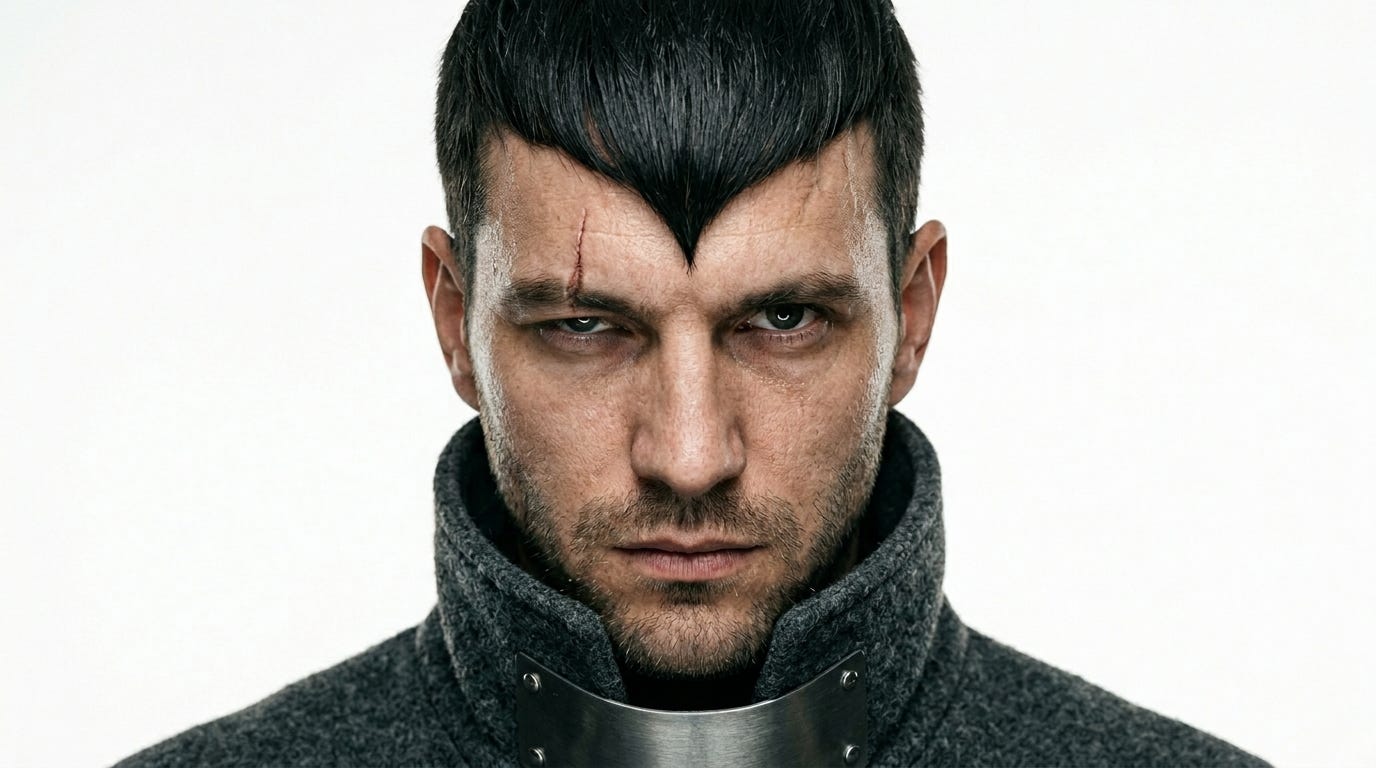
Why this works:
It gives the model:
the framing
the background
the face
the expression
the scar
the hair
the clothing
the lighting
the camera style
the texture
the mood
That level of detail helps the character feel specific.
And specific is what makes AI output better.
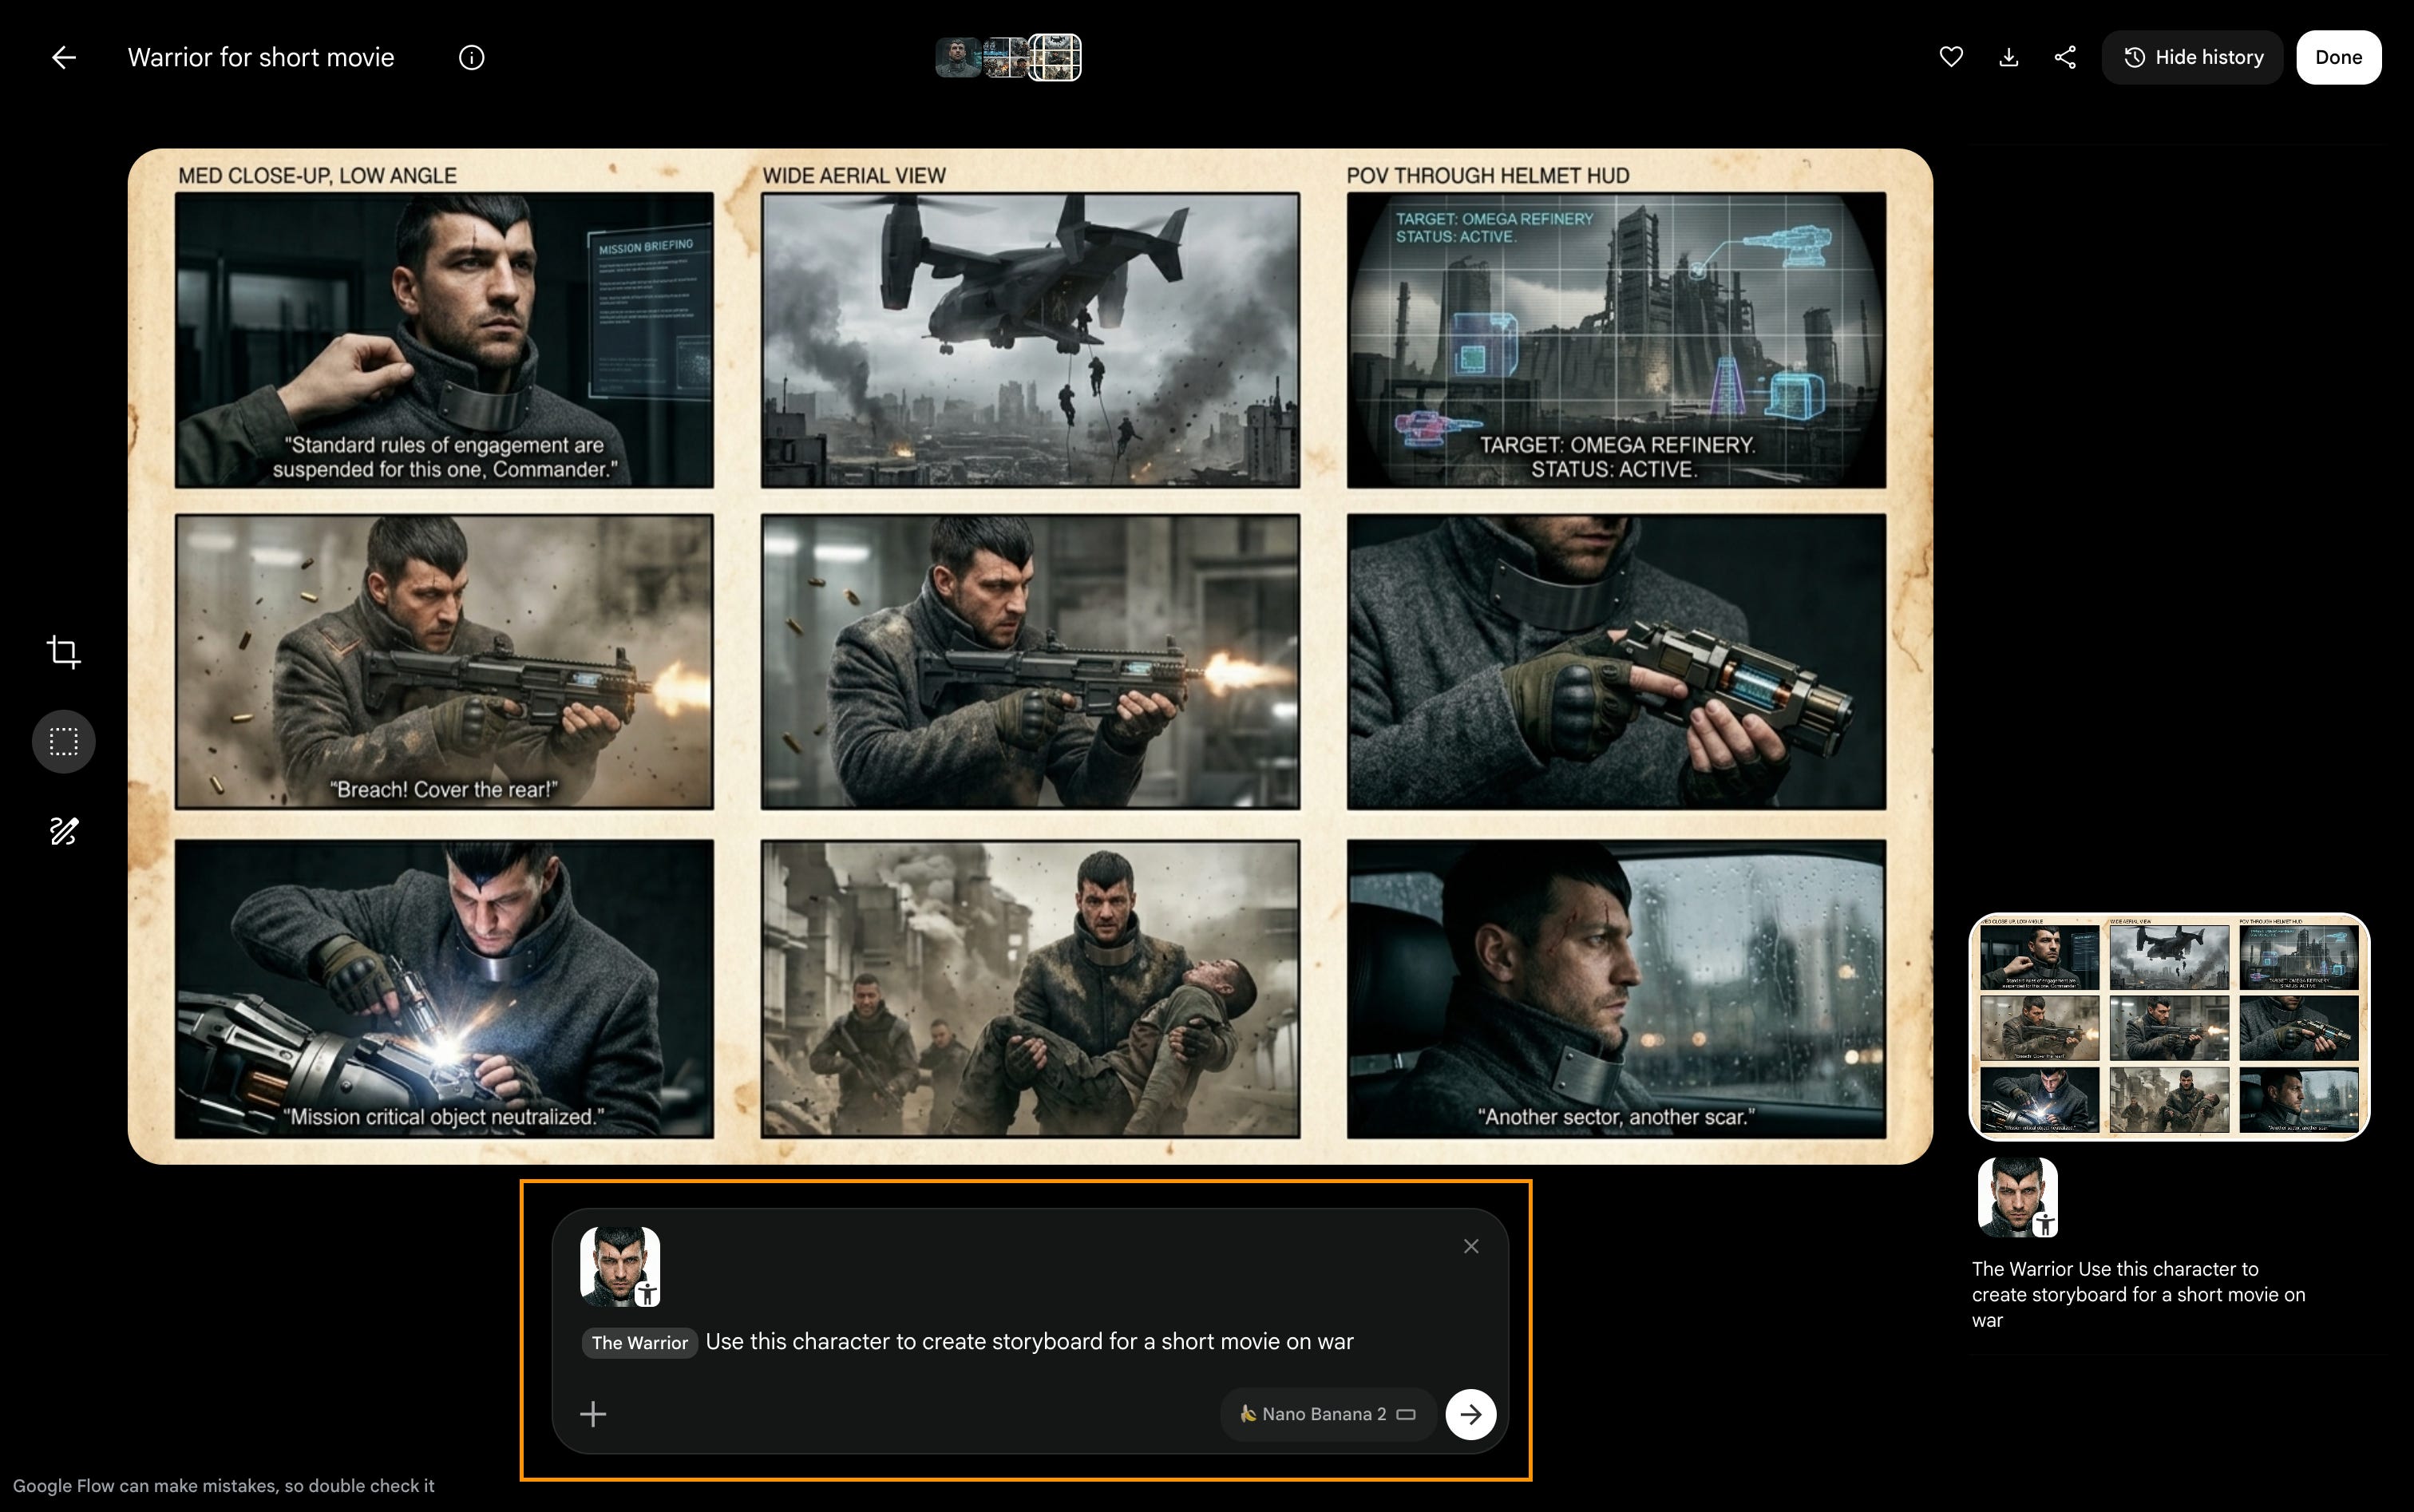
Step 2: Create The Storyboard
Once I had the character, I used the character as the reference for the storyboard.
The storyboard is the roadmap of the movie.
It tells the model what the scene is about before you generate the actual video.
For this, I used a very simple prompt:
Prompt:
That prompt is simple, but you can go much deeper.
If I wanted more control, I would expand it like this:
Expanded Prompt:
Use this character to create a cinematic storyboard for a short movie titled “The Warrior.”
The story is about a battle-worn warrior preparing for war.
Create 6 storyboard frames.
For each frame, include:
- scene description
- camera angle
- character action
- lighting
- environment
- emotion
- cinematic direction
Keep the character visually consistent across all frames.
The tone should feel dark, cinematic, intense, and realistic.
Avoid cartoon styling, fantasy exaggeration, and inconsistent facial features.
This is where you can start shaping the story.
You can decide:
where the character is
what happens first
what the mood feels like
how the camera moves
what emotion the viewer should feel
That is the difference between generating random clips and directing a scene.
Step 3: Generate The Movie
Once the character and storyboard were ready, still in Google Flow.
I referenced both in the final video prompt.
The idea is simple:
Use the character for consistency.
Use the storyboard for structure.
Use the final prompt for direction.
Here is a prompt structure you can use:
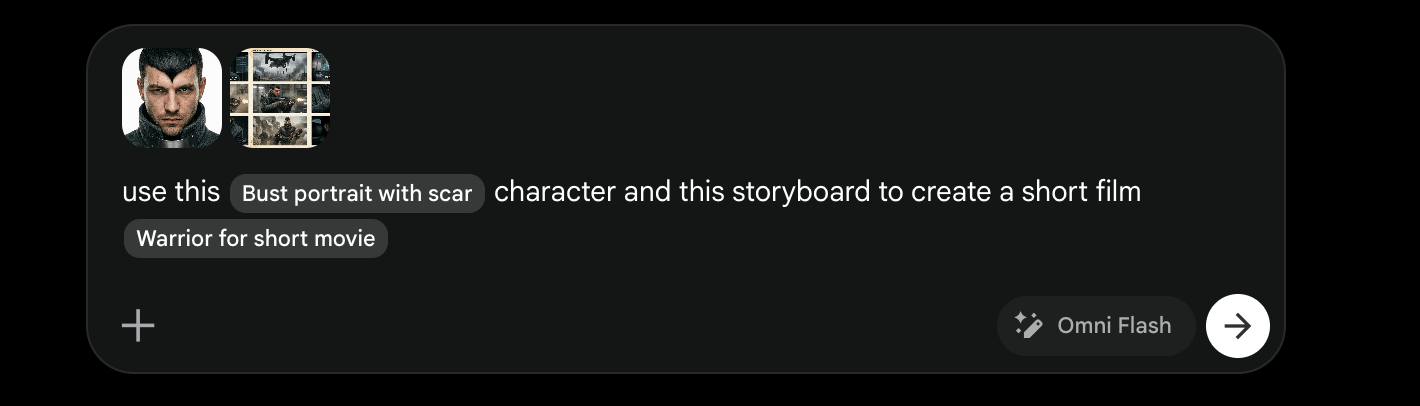
Expanded Prompt can be:
Create a cinematic AI-generated short film using the attached character and storyboard as references.
Keep the character visually consistent across the entire video.
Follow the storyboard closely.
Film style:
- cinematic
- hyper-realistic
- dark and atmospheric
- realistic motion
- dramatic lighting
- shallow depth of field
- smooth camera movement
- premium film look
The movie should feel like an intense opening scene from a high-end war film.
Avoid:
- cartoon look
- inconsistent face
- random costume changes
- cheap video game style
- unrealistic motion
- over-saturated colours
- obvious AI artifacts
Make the final video feel grounded, cinematic, and emotionally intense.
That’s the whole workflow.
Character.
Storyboard.
Movie.
The tool is powerful, but the real skill is direction.
This is where content creation is going.
The people who win won’t just be the people who know which button to press.
It will be the people who can think like directors.
They’ll know how to create characters.
How to build worlds.
How to shape emotion.
How to make people feel something.
That is why business owners should care.
Because very soon, brands will not just be posting content.
They will be producing worlds around their products.
And the businesses that learn this early will have a serious advantage.
This is the future of content creation.
Not just more posts.
More worlds.
Thanks for Reading
Stay LockedIN